Wednesday, September 14, 2011

Android app to monitor & open and close garage door

Have you ever wanted to know if your garage door is open without having to go and check it? There have been many blog posts to light an LED when you leave your garage door open, but I want something more convenient. I decided to write an Android app that would allow me to monitor my garage door and even open or close from anywhere. I am going to provide complete instructions for building the required hardware and the android app code.

Monitor your garage door with an Android app
What is required? We need to build the following:
  • Using a Netduino board (or an Arduino board with an Ethernet shield) build a sensor to detect if the garage door is open or closed. I chose an infrared phototransistor so I would not have to make physical contact with the door and because it's cheap! Like $1.13 cheap!
    Build and program a garage door sensor
  • To open or close the garage door I wired an Optoisolator to a spare garage door opener.
    Build and program a garage door opener
    Open and close garage door with your Netduino
  • Write a program (or you might hear it referred to as a sketch) to check the sensor and determine if the door is open or close and report it back over HTTP
  • Even though it's not required, I wrote a second RESTful webservice to talk to the Netduino web server (see diagram). That way the Netduino webserver is never exposed outside my private network. I have another computer with the RESTful webservice that has a layer of authentication that is exposed to the internet.
  • And finally an Android app that will display if the garage door is open or closed as well as open or close it. Here are step by step instructions (with complete source code) for writing the Android App.
I will be covering each step with a detailed post.

Saturday, July 2, 2011

Store and Get an Object in Android Shared Preferences

Can I store and retrieve an object in Android Shared Preferences? Yes! This tutorial will walk you through a complete tutorial. Source code included! There are times when you need to store a lightweight object in Shared Preferences. I stress lightweight. We are going to use Google's JSON library to do the object serialization/de-serialization.
  • Let's create a new project.
Download the latest gson jar from http://code.google.com/p/google-gson/downloads/list. I am using version 1.7. Place the jar somewhere convenient (If I intend to use the jar in several projects, I will place in a folder outside of my project). For this example, I will create a new folder called "lib" inside the project folder. Place the jar you downloaded in "lib" folder. Now we need to add a reference to gson jar.
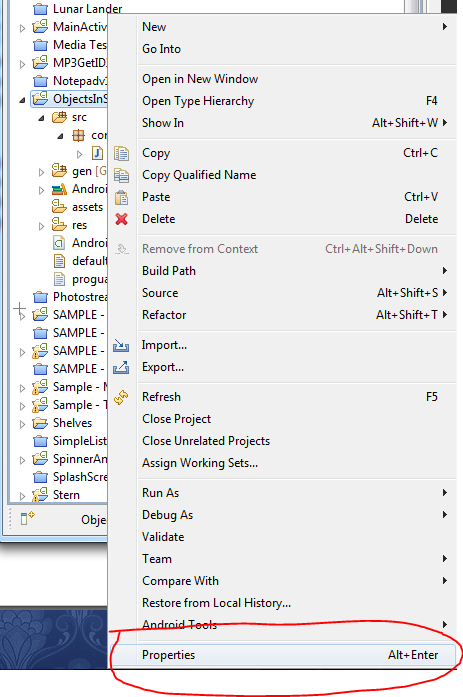
  • Open the project properties. Right click on project name "ObjectsInSharedPreferenceSample" or whatever you called your project and select "Properties"
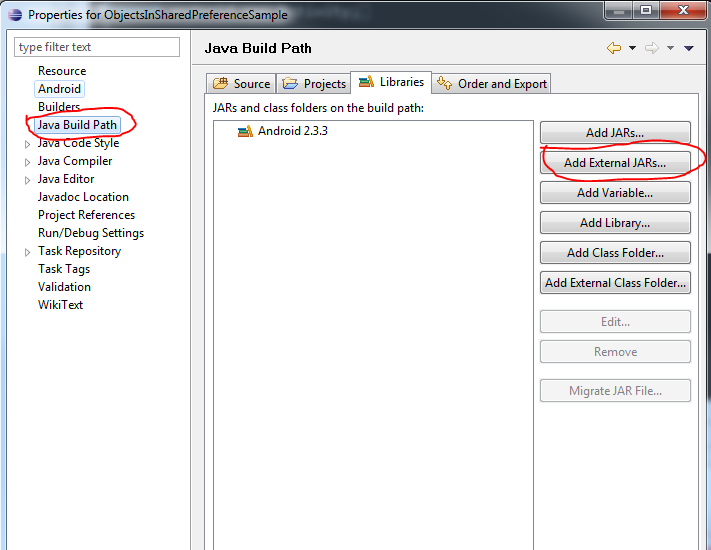
  • Select "Java Build Path" > "Add External JARS..."

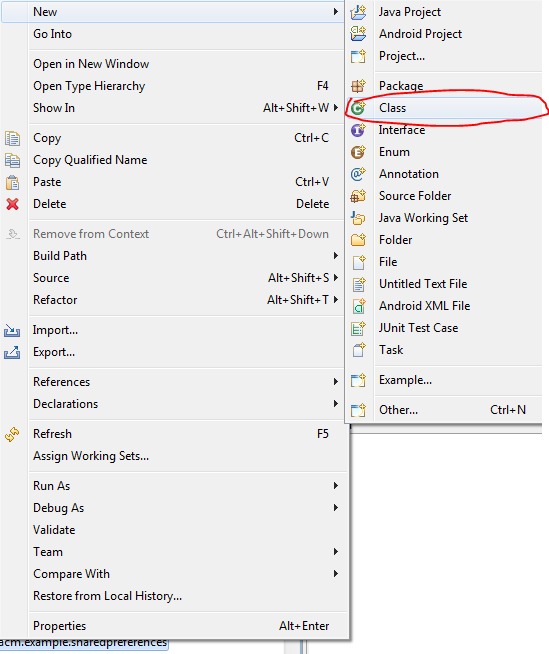
  • Let's add a custom class that we are going to store and retrieve in the Shared Preferences. Add a new class "MyObject"


  • To keep the example simple, lets add just two public properties to our "MyObject" class
    • public int myValue;
    • public String MyLabel;
  • Add two buttons and two EditText. Make sure to add the onClick directive the XML so when the button is pressed our methods are executed.


  • Let's write some code. In the MainActivity add the following method. This method will be called when the store button is pressed. It will create an instance of "MyObject" and set the "MyValue" string to what ever you type in the EditText inputEditText. Then it will convert the object to a string using the gson library and store that string in the SharedPreferences.
public void storeButton_Clicked(View v){
     EditText inputEditText = (EditText) findViewById(R.id.inputEditText);
     MyObject obj = new MyObject();
     obj.myValue = 2;
     obj.MyLabel = inputEditText.getText().toString();
     SharedPreferences appSharedPrefs = PreferenceManager
  .getDefaultSharedPreferences(this.getApplicationContext());
  Editor prefsEditor = appSharedPrefs.edit();
  Gson gson = new Gson();
  String json = gson.toJson(obj);
  prefsEditor.putString("MyObject", json);
  prefsEditor.commit();
  Toast.makeText(this, "Object stored in SharedPreferences", Toast.LENGTH_LONG);
    }

  • Now let's get the object from shared preferences and display it's properties in the outputEditText. 
public void getButton_Clicked(View v){
     EditText outputEditText = (EditText) findViewById(R.id.outputEditText);
  SharedPreferences appSharedPrefs = PreferenceManager
  .getDefaultSharedPreferences(this.getApplicationContext());
  Gson gson = new Gson();
  String json = appSharedPrefs.getString("MyObject", "");
  MyObject obj = gson.fromJson(json, MyObject.class);
  outputEditText.setText("obj.MyLabel: [" + obj.MyLabel + "] obj.MyValue: [" + obj.myValue + "]");
    }

Run the program. Save an object and retrieve it from SharedPreferences. To keep things as simple as possible I only included required code. There is a lot of code missing that you will want to add like error checking and running off the UI thread. But this will get you started.

Following is the complete source code for your review.

Saturday, April 23, 2011

Eclipse Dark Color Theme

I discovered http://www.eclipsecolorthemes.org for conveniently creating your own personal color scheme for eclipse. I am making available the dark theme I have been using for some time. Try it out or create your own easily on http://www.eclipsecolorthemes.org.


Color scheme import instructions
  1. Download the my color scheme from http://www.eclipsecolorthemes.org or create your own.
  2. Choose "File" > "Import"
  3. Choose "Preferences" then "Next"
  4. Browse to the ".epf" file you downloaded and select it.Then press "Finish".
And now your code window should immediately display your new color scheme.


Thursday, March 3, 2011

Android app & Netduino plus to monitor and open garage door


I have started a new blog on the Netduino plus board. This is my first foray into embedded programming. I just received an Arduino Uno board and a Netduino plus board. I am going to chronicle a home automation project that includes the following elements (I will be documenting everything you need if you want to join me!) 

  • Netduino plus with garage door sensor
  • Open and close the garage door with the Netduino plus
  • Send commands to the Netduino over HTTP
  • A RESTful webservice that talks to the Netduino plus over HTTP
  • Write an Android app that talks to the RESTful webservice that talks to the Netduino
  • An Android app to monitor my garage door and open/close it.
I will be posting every step of this project with parts lists, instructions and code examples. If you want to learn more here are some links.

Tuesday, April 27, 2010

Comparing The Old & New Eclipse Theme .prefs Files

by Guest Contributor Bill Mote

If you're wondering what's inside the 2 prefs files we replaced in the Eclipse themes post; here is a "compare" (or diff) using Eclipse's own built-in compare function.  The files are human readable.  The original unedited file is on the left in each image.  Click each image to enlarge:

org.eclipse.jdt.ui.prefs

org.eclipse.ui.editors.prefs


Monday, April 26, 2010

Applying Themes to Eclipse

by Guest Contributor Bill Mote

--> Skip to the How-To

I'm new to event driven development.  I stopped coding back when VB was in it's infancy.  I did pickup classic ASP and do enough scripting in interpreted languages to kindle the desire, but it was not until the release of Android that I genuinely got on fire about coding again.

What did I find?  A lot of barriers.  You wouldn't think that's true given the open and free nature of Android.  Greg, aka Android Code Monkey, has put together an idiot proof tutorial on setting up the development environment.  That was my first hurdle.  Check.  I moved on to his Hello Android tutorial.  Check.  Next I tried the Android Developer's NotepadCodeLab tutorial.  Easy enough I thought.  This time you just "open the AndroidCodeLab folder" as instructed and you're moving right along.

Open it how?  I tried various imports.  I tried opening the source and various .xml files.  All I did was build my frustration, but I'm not giving up.  Instead I purchased "Head First Java."  The book is awesome.  It focuses on teaching Java and avoiding the IDE hurdles but I decided to code the examples in Notepad++ and Eclipse so I could be 1 step ahead when I finished.  The leap from C++ to Java isn't that great and things seemed to make sense so I'm moving right along.

One thing I noticed about the Eclipse environment is how absolutely blinding it is!  During the day it's tough enough, but at night, when I get most of my keyboard cycles for development, the open IDE is exhausting on my eyes.  Another hurdle ...

Cut to the chase already ...

When Greg asked me to be a guest contributor I couldn't wait to get this information posted.  I want to remove as many barriers as I can for new developers like myself!

My first searches for Eclipse and Themes didn't produce much and the information that was available was, or at least seemed, convoluted and complicated.  Turns out changing the themes in Eclipse is very, very easy!

There are 2 files used to display the themes:

Colors are managed in this file: org.eclipse.jdt.ui.prefs
Text Editors are managed in this file: org.eclipse.ui.editors.prefs

Those files can be found below your Eclipse workspace folder which can be found here:

Windows -- .metadata\.plugins\org.eclipse.core.runtime\.settings
Linux/MAC -- .metadata/.plugins/org.eclipse.core.runtime/.settings/

I found an archive file with 6 different themes including the "default" to easily undo any of your changes.  Here's what they look like:

Inkpot

Sula


Vibrant Ink


Wombat


Zenburn

The archive contains the 6 images and 6 folders; 1 for each theme.  In each folder you'll find the 2 aforementioned files.  Simply extract the 2 files from your desired theme into the appropriate Eclipse folder as described above and launch Eclipse!

Monday, March 15, 2010

Getting Started with Android Development

You want to be begin Android Application Development. But how do you get started? The first thing you need is to download and install the development tools. The good news is they are free and fairly straightforward to setup. The bad news is there are so many options it can become confusing which tools are required, optional or compatible with your desired setup. Following the setup I am using and will work for you if you using a Windows system.

Step 1. Install the following tools
  • Eclipse IDE for Java Developers (v3.5 Galileo)
  • Java Platform (JDK 6 Update 18)
  • Android SDK Tools, Revision 4
You can follow my previous post for step by step directions (with screen captures) here.

Step 2. Create your first application. Try my Hello World tutorial here.

Feel free to post questions or comments.