Tuesday, January 26, 2010

How to take Android Screen Shot

Currently, there are no applications available to take a screen capture for Android. This is a step by step guide to take a screen captures.

Step 1: Install Java Platform (JDK 6 Update 18)
Step 2: Install the Android SDK Tools, Revision 4
Step 3: Configure your Nexus one
  • From your home screen (pictured below) press "Launcher" icon to view all applications.
  • Start "Settings"
  • Select "Applications"
  • Select "Development"
  • Check "USB debugging" if it's not already checked.
 Step 4: Launch the Dalvik Debug Monitor
  • Go to your Android SDK folder > "Tools". On my system I placed the Android SDK here "C:\Program Files\eclipse\android-sdk-windows" so I will navigate to "C:\Program Files\eclipse\android-sdk-windows\tools"
 
  • Double click on "ddms.bat" to launch the Dalvik Debug Monitor.

NOTE: IF IT FAILS TO LOAD and the window just closes immediately, you might have to update your system Environment path for JAVA.
  • If it did not launch go to "Control Panel > System > Advanced system settings"
  • Press "Environment Variables..."
  • Select "Path"
  • Press "Edit..."
  •  Add the path the path to JAVA (;C:\Program Files\Java\jdk1.6.0_17\bin) to the end of the "variable value"
  • Press OK and save your changes.
  • Continue by double clicking on "ddms.bat" to launch the Dalvik Debug Monitor in the "tools" directory. 
  • The application will launch and your phone will be listed.
  • Select "Device > Screen capture..."
  • The capture appears.
  •  Now you can copy and paste the screen capture into a photo application or save a copy.

Saturday, January 23, 2010

How to Setup Android Development Environment

There are many ways to develop for Android and because of all the options it is sometimes a little daunting getting your environment setup. I found myself bouncing from web page to web page, not really sure if I had the right tools and if they were setup correctly. I wanted to document the process that worked for me.

Goal: Step by step instructions to install and configure your Android development environment for Windows.

Environment/tools: Here is the setup I have chosen to use.
  • Windows (I'm using Windows 7, but any flavor of windows will do)
  • Eclipse IDE for Java Developers (v3.5 Galileo)
  • Java Platform (JDK 6 Update 18)
  • Android SDK Tools, Revision 4
 Step 1. Install Eclipse IDE
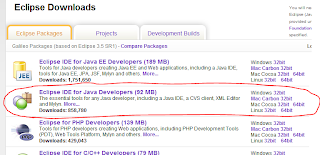
I chose to use the Eclipse IDE for Java Developers (v3.5 Galileo). You can download the it here
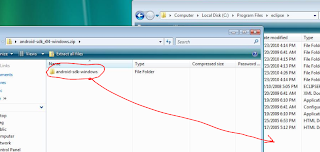
  • This is a zip file and does not require installation. Just copy the eclipse folder into your programs directory
Step 2:  Install Java Platform (JDK 6 Update 18)
  • Select your platform

  • Now run the JDK installation. I did not change any of the default installation options. When complete continue to step 3.


Step 3: Download the Android SDK Tools, Revision 4

  • This does not require installation. Just unzip and copy the files. You can install the package anywhere but remember where you put as you will need to reference it in Eclipse. I happen to install it inside my eclipse folder.

Step 4:  Configure Android SDK


  • Launch "SDK-Setup.exe" located in the Android SDK install folder"
  • If you receive the following "Failed to fetch url https://dl-ssl.google.com/android/repository/repository.xml" we need to change the URL to not use SSL. Close the error dialog.
  • Press "Cancel" on the "Choose Packages to Install" Dialog
  • Select "Settings" in the left pane
  • Check "Force https://... sources to be fetched using http://"
  • Press "Save and Apply"
  • Select "Available Packages" in the left pane
  • Select "Documentation" (at the top of the list)
  • Select "Usb Driver Package, rev 3 (at the bottom of the list)
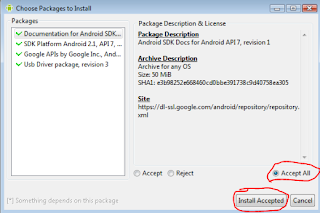
  • And then select any platform you want to develop. You can select all (be prepared for a long download) or you can select only the platfrom for you phone. The Nexus One uses 2.1 and the Droid for Verizon uses 2.0.1.
  • Check "Accept All" and Press "Install Accepted"

  • When done press "Close"
  • Now we are going to create a virtual device (AVD)
  • Select "Virtual Devices" in the left pane
  • Select "New..."
  •  Create the following new Android Virtual Device
    • Name: Android2.1
    • Target: Android 2.1 API Level 7 (Or which ever API you installed)
    • SD card Size: 4000 MiB to 32000MiB (16000 MiB shown)
    • Leave the rest at the default settings

  • Press "Create AVD". Be patient it may take a few minutes to create your new AVD.
  • Close the SDK setup. 
Step 5:  Configure Eclipse
(These instructions are for Galileo version of Eclipse. Please see this page for instructions if you downloaded the Ganymede version of Eclipse)

  • Launch Eclipse for the first time. You will be asked where you want to your workspace folder to be located. 
    • I used the default location. 
    • Check "Use this as the default and do not ask again" so you don't have to answer this question every time.
    • Press "OK".

  • Select "Help > Install New Software..."
  •  Press "Add..."
  • Fill out the Add Site information
    • Name: Android
    • Location: https://dl-ssl.google.com/android/eclipse/
    • Press "OK"
 If you get an error don't use SSL. change location from "https://dl-ssl.google.com/android/eclipse/" to "http://dl-ssl.google.com/android/eclipse/"
  •  After a connection is made and available tools are retrieved expand "Developer Tools" and select "Android DDMS" and "Android Development Tools"
  • Press "Next"
  • Press "Next" again.
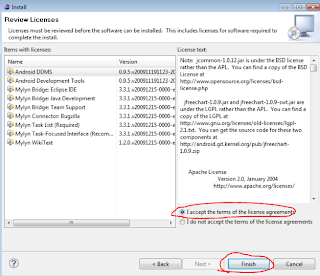
  • Check "I accept the terms of the license agreements"
  • You may receive a Security Warning about unsigned content. Press "OK"
  • Done. Now you should restart Eclipse.
  • After rebooting we need to tell Eclipse where we copied the "Android SDK" in step 3.
  • Select "Windows > Preferences"
  • Select "Android" from the left pane. After you select "Android" you will receive an error. That is because it is not setup yet. We are setting it up now.
  • For the SDK Location, browse to where you installed the SDK.
  • Press "OK"
  • A dialog box will appear. If you want to send usage data to Google leave it checked, other uncheck it and press "Continue". This dialog box can sometimes get trapped beneath your window. Minimize Eclipse if you don't see it.

 You are now ready to build your first application. To create a "Hello World" app check out my post here. If you have any questions feel free to post a comment and I will do my best to answer.

    Wednesday, January 20, 2010

    Hello World - Your First Android Application

    Following is a step by step guide in creating your first "Hello World" Android application.It was created with the following setup:
    • Windows (I happen to be using Windows 7, but any flavor of windows will do)
    • Eclipse IDE for Java Developers (v3.5 Galileo)
    • Java Platform (JDK 6 Update 18)
    • Android SDK Tools, Revision 4
    Let's get started...

    • Create a new Android project (File > New > Android Application)
    • Set your project properties
      • Project Name: Hello World
      • Build Target: Select Android 2.1
      • Application Name: Hello World
      • Package Name: com.android.test
      • Create Activity: HelloWorld
    • Press "Finish"

     Now you have your project created let's write some code! Your code is located in a file called HelloWorld.java in the src folder. Your screen layout file is main.xml in the layout directory.
    Let's take a look at the main.xml (layout) file. Open main.xml. You should now see it in "Layout" mode like this...

    and if you select "main.xml" you can view/edit the xml markup
    Let's remove the default textview to cleanup our display
    • Return to "Layout" mode
    • Right click on "Hellow World, HelloWorld!" TextView and select "Remove"
    Drag a button on to layout
    View/edit the XML by clicking on "main.xml"
    • Change android:text="@+id/Button01" to android:text="Click Me"
    • Save your changes
    Your main.xml file now is complete and should look like this
    <?xml version="1.0" encoding="utf-8"?>
    <linearlayout xmlns:android="http://schemas.android.com/apk/res/android"
        android:orientation="vertical"
        android:layout_width="fill_parent"
        android:layout_height="fill_parent"
        >
    
    <button android:text="Click Me" android:id="@+id/Button01" android:layout_width="wrap_content" android:layout_height="wrap_content"></Button>
    </LinearLayout>
    
    Now we have a button let's make something happen when the button is pressed.
    • Open "HelloWorld.java" file. There is already code for when the class is created that set's the content view.
    @Override
        public void onCreate(Bundle savedInstanceState) {
            super.onCreate(savedInstanceState);
            setContentView(R.layout.main);
        }
    
    • Add the highlighted code on line #5. Create a button object and reference the button we placed on our layout. After you add the following line of code you will get an error. This is because you need to import "android.widget.Button". The fastest way to import is the hotkey Ctrl-SHIFT-O. This will add all missing imports.
    @Override
        public void onCreate(Bundle savedInstanceState) {
            super.onCreate(savedInstanceState);
            setContentView(R.layout.main);
            Button button = (Button) findViewById(R.id.Button01);
        }
    
    
    • Register a callback to be invoked when this button is clicked. Add the highlighted code in lines #6-#10. 
    @Override
        public void onCreate(Bundle savedInstanceState) {
            super.onCreate(savedInstanceState);
            setContentView(R.layout.main);
            Button button = (Button) findViewById(R.id.Button01);
            button.setOnClickListener(new OnClickListener() {
               @Override
               public void onClick(View v) {
               }
             });        
        }
    
    • Now let's add some code in the method "OnClick" to pop up a message when the button is clicked. Add the highlighted code on line #9.
    @Override
        public void onCreate(Bundle savedInstanceState) {
            super.onCreate(savedInstanceState);
            setContentView(R.layout.main);
            Button button = (Button) findViewById(R.id.Button01);
            button.setOnClickListener(new OnClickListener() {
               @Override
               public void onClick(View v) {
                Toast.makeText(HelloWorld.this, "Hello World", Toast.LENGTH_SHORT).show();
               }
             });        
        }
    

    Now let's run our new application.
    • Select "Run > Run"
    • You will get a dialog "Run As". Select "Android Application"
    You may receive "Android AVD Error" if you have not setup an android emulator device.
    • Select yes to setup a new Android Virtual Device
    • Select "New"
    •  Create the following new Android Virtual Device
      • Name: Android2.1
      • Target: Android 2.1 API Level 7
      • SD card Size: 4000 MiB
      • Leave the rest at the default settings

    • Press "Create AVD". Be patient it will take a minute to create your new AVD.
    • Select your new AVD and run your application.
    When you click the button you should see the following
      
    NOTE: If you receive an error try the following:
    • Try removing "@Override" on line 18.
    • change line 15 from "setContentView(R.layout.main);" to "this.setContentView(R.layout.main);"

    Complete source for project
    HelloWorld.java
    package com.android.test;
    
    import android.app.Activity;
    import android.os.Bundle;
    import android.view.View;
    import android.view.View.OnClickListener;
    import android.widget.Button;
    import android.widget.Toast;
    
    public class HelloWorld extends Activity {
        /** Called when the activity is first created. */
        @Override
        public void onCreate(Bundle savedInstanceState) {
            super.onCreate(savedInstanceState);
            setContentView(R.layout.main);
            Button button = (Button) findViewById(R.id.Button01);
            button.setOnClickListener(new OnClickListener() {
               @Override
               public void onClick(View v) {
                Toast.makeText(HelloWorld.this, "Hello World", Toast.LENGTH_SHORT).show();
               }
             });        
        }
    }


    main.xml
    <?xml version="1.0" encoding="utf-8"?>
    <linearlayout xmlns:android="http://schemas.android.com/apk/res/android"
        android:orientation="vertical"
        android:layout_width="fill_parent"
        android:layout_height="fill_parent"
        >
    <button android:text="Click Me" 
     android:id="@+id/Button01" 
     android:layout_width="wrap_content" 
     android:layout_height="wrap_content"></Button>
    </LinearLayout>
    

    Download the complete project


    If you import the project and receive a Must Override a Superclass Method Error, your targeting the wrong JDK version. Go to my blog post to resolve this error. http://androidcodemonkey.blogspot.com/2011/10/how-to-solve-must-override-superclass.html

    Please feel free to post comments or questions. I will do my best to answer your questions.